Sonork Instant Messaging
User Guide


February 2003
Product Version: Sonork Server V 1.7


This manual describes the different installation procedures that can be
used to install or update Sonork IM Server to Version 1.7 .


User Guide
Copyright Notice


© Copyright GTV Solutions, Inc. 1996, 2003. All rights reserved. May only be used pursuant to a Sonork Messaging Systems Software License Agreement. No part of this publication may be reproduced, transmitted, transcribed, stored in a retrieval system, or translated into any computer language, in any form or by any means, electronic, mechanical, magnetic, optical, chemical, manual, or otherwise, without prior written permission of GTV Solutions, Inc. GTV Solutions, Inc. grants you limited permission to make hardcopy or other reproductions of any machine-readable documentation for your own use, provided that each such reproduction shall carry the GTV Solutions, Inc. notice. No other rights under copyright are granted without prior written permission of GTV Solutions, Inc. The document is not intended for production and is furnished “as is” without warranty of any kind. All warranties on this document are hereby disclaimed, including the warranties of merchantability and fitness for a particular purpose.
U.S. Government Users Restricted Rights—Use, duplication or disclosure restricted, contact GTV Solutions. Inc.

Trademarks
Sonork Messaging System, and the Sonork logo are trademarks or registered trademarks of GTV Solutions, Inc. in the United States, other countries, or both.
Microsoft, Windows, Windows NT, and the Windows logo are trademarks of Microsoft Corporation in the United States, other countries, or both.
UNIX is a registered trademark of The Open Group in the United States and other countries.
Other company, product, or service names may be trademarks or service marks of others.

Notices
References in this publication to Sonork systems, products, programs, or services do not imply that they will be available in all countries in which GTV Solutions, Inc. operates. Any reference to these products, programs, or services is not intended to imply that only Sonork systems, products, programs, or services can be used.
Subject to valid intellectual property or other legally protectable right of Sonork, any functionally equivalent product, program, or service can be used instead of the referenced product, program, or service. The evaluation and verification of operation in conjunction with other products, except those expressly designated by GTV Solutions, Inc., are the responsibility of the user. GTV Solutions, Inc. may have patents or pending patent applications covering subject matter in this document. The furnishing of this document does not give you any license to these patents. You can send license inquiries, in writing, to the Sonork Director of Licensing, GTV Solutions, Inc., 49E. 21st. Street, 9th Floor, New York, NY 10010, United States of America.

© Copyright GTV Solutions, Inc. 2003. All rights reserved.
US Government Users Restricted Rights – Use, duplication or disclosure restricted, contact GTV Solutions, Inc.

About This Manual
This Manual describes the different installation procedures that can be used to install or upgrade Sonork Instant Messaging System to Version 1.7

I. Audience
The target audience for this guide is system administrators responsible for the installation of Sonork products and patches. Users of this guide should have knowledge of the following:

PC operating Systems
Database architecture and concepts
Networking
Graphical user interface

II. Organization
This manual is organized as follows:

Chapter 1: What is Sonork?
Chapter 2: Installing the Sonork Client in a Windows Operating System
Chapter 3: The Main Console
Chapter 4: The User List
Chapter 5: The Message History Console
Index

III. Related Documents
Sonork provides the following related documentation:

Sonork Release Notes: may contain important undocumented information about anything related to Sonork Server that may affect your installation.

You can also view the Sonork Version 1.7 Technical Update for any additional information not included in this manual. You can access the Technical Update from the following URL: http://www.sonork.com/eng/support.html

IV. Reader’s Comments
Sonork welcomes any comments and suggestions you have on this and other Sonork manuals.
You can send your comments in the following ways:

Fax: 1-212-228-9600 Attn: SLD Publications
Internet electronic mail: readers_comment@sonork.com
Postal Address:

GTV Solutions
Attn: SLD Publications
49 East 21st Street
New York, NY 10010
USA

A Reader’s Comment form is located on your system in the following location:
$SONORK/doc/readers_comment.txt
Please include the following information along with your comments:

The section numbers and page numbers of the information on which you are commenting.
The version of Sonork that you are using.
If known, the type of processor that is running the Sonork Messaging System software.

The Sonork Library Department ( SLD) cannot respond to system problems or technical support inquiries. Please address technical questions to your local system vendor or to the appropriate Sonork technical support office. Information provided with the software media explains how to send problem reports to Sonork.

V. Conventions
This guide uses several typeface conventions for special terms and actions. These conventions have the following meaning:

BOLD Commands, keywords, file names, authorization roles URLs, names of windows and dialogs, other controls, or other information that you must use literally is in bold.
Italics Variables and values that you must provide, new terms, and words and phrases that are emphasized are in italics.

This Guide uses the UNIX convention for specifying environment variables and directory notation:

When using the windows command line, replace $variable with %variable% for environment variables and replace each forward slash (/) with a backslash (\) in directory paths.

VI. Publications On-line
When GTV published an update version of one or more online or hardcopy publications, they are posted to the Sonork Information Center. You can access updated publications in the Sonork Information Center from the following Sonork Customer Support Web Site: http://www.sonork.com/eng/support.html
The Sonork Information Center contains the most recent version of the books in the product library in PDF or HTML formats, or both. Translated documents are also available for some publications.

VII. Ordering Publications
You can order many Sonork publications online at the following Web site.
http://www.sonork.com/sonork.html
From this Web page, select Publications and follow the instructions.
In other countries, for a list of telephone numbers, see the following Web site: http://www.sonork.com/eng/contact.html

VIII. Customer support
If you have a problem with any Sonork product, you can contact Sonork Customer Support. See the Sonork Customer Support Handbook at the following Web Site: http://www.sonork.com/eng/support.html

Or visit
http://www.sonork.com

Server support
server-support@sonork.com

Client support
client-support@sonork.com

Developer support
developer@sonork.com


What is Sonork?

Sonork is a localization and data transfer software that has a built-in Instant Messenger.

Localization means that it allows you to locate other users/devices or services regardless of where they are. For example: You may need to talk to a friend overseas but you don't know if he/she is connected right now. If you both install Sonork and authorize each other, Sonork will notify both of you when the other user is online, regardless of the place, computer or method used to connect.

Data transfer means that the software includes mechanisms to exchange data between two or more users. For example: Files, chat or messages.

Instant Messenger means that it utilizes the data transfer feature to allow users to exchange quick chat-like messages. If the other user is not online at the moment of sending the message, the message will be stored and delivered when he/she connects

Installing the Sonork Client

This section explains how to install and configure the Sonork Client in a Windows Operating System.

Once you have installed or updated the Sonork Server, the installer program places a copy of the client install program (Sonork-client-installer.exe) in $SONORK/client folder you selected during the installation. It also creates a special configuration file named Sonork.ini in the same directory that contains the all data needed by client to connect up to the server.

The latest version of the client installer may also be downloaded at any time from http://www.sonork.com/eng/downloads.html. This client is free of charge.

Running the installation program

Copy the Sonork-client-installer.exe to the desktop you want to install, by downloading from Internet, copying it from the folder you share at the server, or just running from the folder you share.

When you execute the program you will see the next window

Client Installer Welcome
Window Figure 0-1

On this window you can select the language you want to install and the installation folder. For the client we name this root folder $SONORKCLNT.

When you decide where you will put the client program you can click on next button to continue.
If you click exit the programs will quit and nothing will be installed.

Private net/Extranet support

When prompted, check the "Install Sonork for private networks" option and the installer will ask you for the location of your configuration file: It is asking for the path to the "sonork.ini" file mentioned above. (If you run the installer from the "client" folder, setup will auto-detect the file)

Network Types Window
Figure 0-2

If you are going to connect to a public service, like server.Sonork.com, you must uncheck the “install support for private networks (Intranet)”.
If you are going to connect to a corporate server (a private one) this check box must be marked. If this is marked you must provide the Sonork.ini configuration file.

Client startup mode

Once installed, the Sonork messenger will ask if it must start in "Intranet (Private)" or "Internet (Public)" mode.

Private (Intranet/Extranet) mode

In this mode, Sonork will connect to the server specified in the "sonork.ini" file used during installation. This file should contain the address of your server (See Network configuration)

When in private mode, the messenger can only connect to private servers.

NOTE: The server does not need to be in the same network; you may connect over the Internet. For example: You can connect to your company's Sonork Server from your house, using a dial-up connection.

Internet (Public) mode

In this mode Sonork will connect to the Public Sonork Server run by the Sonork Company located at "server.sonork.com".
When in "public" mode, the messenger will not be able to connect to any other server, even if you change Sonork's network configuration.

NOTE: You may disable this mode while installing by clicking on the "Advanced" button or by configuring your firewall to block connections to "server.sonork.com", ports 1503 and 1504.

Start Options

In the next window you will see (
Figure 0-3) you can select if you want the Sonork client to start when you start the windows session. The installer will put a shortcut on your desktop if you check “Create Desktop shortcut”


Start Options
Figure 0-3

Advanced Start Options

The "Advanced" button will show you
Figure 0-4 and lets you enable/disable various options. If you wish to place the data folder separate from the application folders, click on the "Advanced" button. It will allow you to specify the folder where the temporary and data files will be placed.

You may specify the same folder for all users; Sonork names its files in such way the profiles don't mix even when the data folder is the same for all users and profiles.

Disable “ini” configuration file selection

Use this advanced option if you want the user not to be able to select a different Sonork.ini configuration file.

Disable “Internet” mode

Use this advanced option if you want the user not to be able to connect to GTV Solutions, Inc. public server in the Internet.

Start with windows, Override user preference

Use this advanced option if you want the Sonork client to start when the user’s windows session starts.

Skip copy of shared files

Use this advanced option if you have installed the application on a network-shared folder and you are making this installation to point to that folder.


Start Options, Advanced
Figure 0-4

Now you can click over the install button to start the installation process.

Client's account/profile

Once the Sonork messenger has started, it will ask for a user profile.
A profile is a copy of a Sonork user account stored on the server: This means that the account must exist on the server before it exists in the client.

Sonork allows you to create new accounts from the messenger itself (unless the server administrator disables this function using the configuration utility).
If Sonork finds profiles in the local computer (for example, after re-installing), it will list them so that you can choose one. If your account is listed, select it and choose "Accept". If none of them apply, click on the "Add" button and proceed to the "Create/Recover profile" step (next section).

If Sonork does not find any profiles (for example, after installing for the first time), it will automatically jump to the "Create/Recover profile " step (next section).

Profiles Window
Figure 0-5

C
reate/Recover profile

Add Profile Window
Figure 0-6

Create user

Will create a new account on the server and then create the corresponding profile on the client.

Recover user

Will create a profile on the client based on an existing account on the server. You are allowed to search for an account by user id, alias, name or email.

Use file

Will create a profile on the client based on the configuration file of an existing account on the server. The server administrator should have provided the user configuration file (or URL).

Network configuration
To check the network configuration, select "Configure Network" from the Messenger's Main menu.


The "Host" item under "Sonork" should be the name or IP-number of the machine where the server is running and the Ports should match the server's configuration.


Make sure the "Socks" is not enabled unless you have a firewall in between the computer running the client and the machine running the servers.


The Client configuration file

The server installer creates the "sonork.ini" configuration file and places a copy of the client set up program (sonork-client-installer.exe) in the "client" folder selected during installation.

If you choose to install "private mode", the path to this file must be provided.
The "sonork.ini" file contains the following lines:

[SonorkSetup]
Version=1508
[Servers]
Default=1
[Server.Default]
Host=myserver
TcpPort=1504
UdpPort=1503

After the server installation ends, we recommended you open this file with notepad or any plain text editor and verify that the host entry points to the name or IP-address of the machine running the Sonork Main Server.

A good practice is to share the "client" folder as read-only because:
All users can install the client directly without having to copy both configuration and installer files to their computers.
The server configuration utility automatically updates the "sonork.ini" file if you change the server's settings.

Difference with previous versions

In previous versions, the messenger read this file every time it started. From Version 1.5 and subsequent versions, the configuration file is used only during installation.

The Main console

Main Menu & Tool bar


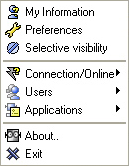
The main menu is accessed by clicking on the Sonork character.
Connection/Online opens the Connect Menu
Users opens the Users Menu

My Information lets you adjust your profile's information
Preferences here you will be able to set up notes about yourself, your picture, your e-mail notifications, customization of the colors, the authorizations for new users and the tracker rooms.

Selective Visibility allows you to access additional online modes. This is a very interesting option.
Clipboard, Secretary, Conference and Send e-mail are shortcuts to frequently used applications (Clipboard and Secretary are also accessible from the "Applications" tab)

The System Log records events (such as e-mail notifications) and system messages.
About Sonork contains information about the version and the people who worked for it.

Connect Menu


Tip: The toolbar button is a shortcut for "Connect/Disconnect" and, if it is pressed while holding down the CTRL key, the "Select user profile" option is opened

Connect will start the connection phase. If the connection cannot be made, Sonork will retry until it connects: Event that will be notified with a sound and the status bar will temporarily change to "connected"


Disconnect will unlink from the server. The status bar will temporarily change to "disconnected"


Configure Network

Allows you to configure the SOCKS settings (if you're using a firewall) and/or the address of your private server. For Internet mode, the server address will always be "server.sonork.com"

Switch to Intranet/Internet Mode

Depending on which mode you are running in, Sonork will allow you to switch modes: Internet mode is for connecting with the main server, Intranet mode is used to connect to private servers.

Users Menu


Tip: The toolbar button is a shortcut for "Add User"

Add User

Lets you search for other users based on their nick, name, email or Sonork ID and then send a request to add them to your list of "Authorized" users.

If the other user is not online, the request will be stored and delivered when he/she connects.
Because of the privacy policy of Sonork, users will not appear on your "Authorized" list immediately. They will appear under "Pending" under they accept (or deny) the request.

Download list from server

Obtains a copy of your profile's user list from the server. Sonork does this automatically when you recover a profile.

Database maintenance

This option allows you to: 1) delete old messages from the message history to reduce the size of the file saved in your PC and 2) in case the message file is corrupted due to a suddenly shutdown of the computer, this option will repair the file and will recover all the messages. NOTE: We strongly recommend to do a back up of all the files in your PC periodically.

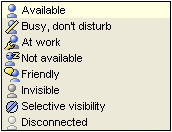
Online Mode


The online mode determines how the other users see you.

Only "Authorized" users will be able to see your status, you will appear as "Disconnected" for everyone else.

If you select "Busy", other users will be prompted for confirmation before sending you a message. The difference with "At work" is that the later indicates that you are accepting work-related messages.
"Friendly" indicates that you are free to chat.

"Not available" is used to indicate that you are on the phone or away from the PC.
"Invisible" will make you appear as disconnected to everyone, no exceptions. If you want to appear as disconnected only to certain users, use the "Selective visibility" option.

User list

Authorized

Authorized users may see your online status and have access to extra information such as your network address (unless you block them).

Users listed here also have additional options such as sound customization and visibility control.
You may create user groups in this list by right clicking on the "Authorized" node and selecting "Create Group". Groups within Groups are also allowed: Right click on the parent group to add a sub-group.

To move a user into a group drag & drop it onto the group node. Groups cannot be deleted until all users are moved out of it.
To send a message to more than one user, select the users by SHIFT+Clicking on them (If you SHIFT+Click a group node, all users in that node will be selected), then right click on any one of the selected users and choose "Group Message".
A shortcut for sending a message to all users within a group is available by right clicking on the group and selecting "Group Message".

Not-Authorized (Not in list)

These users appear with the only purpose of being able to exchange messages with them. They cannot see your online status (nor can you see theirs).

You cannot create groups in this list.

To "promote" a user in this list to the "Authorized" list, right-click on the user and select "Add user"("Authorize user"), this action will move the user to the "Pending" node.
You don't need authorization to add users to this list, simple right-click on the node and select "Add User".

Pending

These are users that have requested (or to which you have requested) authorization to belong to the "Authorized" list. They will move out of this list as soon as the request is answered.
Note: In Sonork user lists are reflexive. This means that if you add a user to your "Authorized" list, you will also figure in their "Authorized" list. If the other user removes you (or you remove him/her), the same will occur on your side.

User context menu and functions


Tip: Double clicking the user opens the Message Console.
If the CTRL key is held down it will open the "Authorizations" dialog

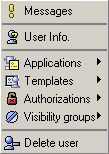
The user menu is accessed by right clicking on the user and provides access to functions specific to the selected user.
Messages opens the message history console used to exchange messages or files.
User info provides extended information about the user. It also allows you to change the "nick" used to display the user and add your personal notes to it.

Applications starts an application on the user. The behavior of this function depends on the application being executed.
Templates opens a user template (This is an advanced function)
Authorizations lets you control the permissions for this user
Visibility groups allows to group users within groups. You will be able to apply certain permissions directly to these users.
Delete user removes it from the list (You will also be removed from the other user's list)


The message history console


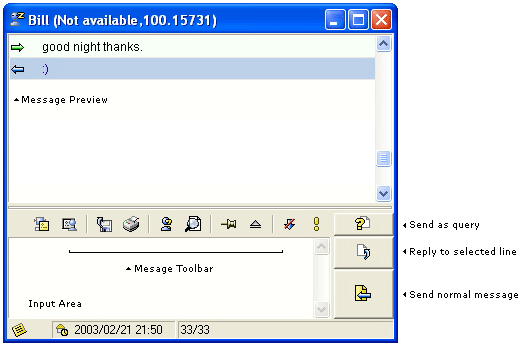
The message history console (or simply "message console") is used to exchange messages, files and URLs with other users. Each user has a separate console, what you write in one console will only be sent to the user displayed on the title bar.

The message console shows a preview of each message, which may be individually opened by double clicking on it. Once a message is open, you can dismiss it with the
button or the ESC key.

Right clicking a line in the preview area accesses the message context menu.

Sending Messages

To send a message, type it in the input area and press the Send as "normal message" button. (You may alternatively press CTRL+ENTER or ENTER, depending on your preferences settings)
To reply to a message someone has sent you, select the message by clicking on it, type the reply in the input area and press the "Reply to selected" button (or press CTRL+R).

The answer will link with the original message, which may be found by clicking on the reply icons (
, ).
The "Send as Query" button will send the input text as a special type of message (a "Query") that stays highlighted as "
" until the other user opens it by double clicking on it.

After opening it, the message will be marked as "read" but it will remain highlighted until it is selected and answered with the "Reply to selected" option.
This feature is used to ensure a query is replied-to (and hence the question and the answer get linked) in situations such as a person requesting for an authorization from its supervisor before executing a task.

Tips: You can create conversation threads by replying to replies. The full thread may be followed by selecting a line belonging to the conversation and repeatedly pressing the "relate message" button on the toolbar ()

A full conversation thread may be selected (for exporting or for drag & drop) by selecting a line belonging to the conversation and using the "Select conversation thread" option of the context menu.
Avoid using the "Send as Query" option with inexperienced users: It is an advanced feature, which may confuse them.

A list of opened but still unanswered queries may be obtained using the search button on the tool bar.

Receiving Messages

Incoming messages generate a sound (which may be customized per user) and the number of unread messages for the user is indicated next to it in the main console.
The total number of unread messages and events is displayed on the main console status bar.
Messages are opened by:

Clicking on the status bar on the main console.
Clicking on Sonork icon on the task bar of windows (next to the clock).
Double clicking the user with unread messages.
Double clicking a user group containing a user with unread messages.

Tips: While using a message console
CTRL+N will loop through all open message consoles. (It won't do anything if there is only one message console open)
The ESC key opens/closes the selected message.
CTRL+UP and CTRL+DOWN scroll the message preview window.
CTRL+SPACE will select the next unread message within the active console (The one you're working on).
CTRL+SHIFT+SPACE will select the next unread message in any message console. (The active console will change if necessary)

Files & URLs

Sending

Files & URLs are sent by either:

Dragging the file or URL onto the input area.
Dragging the file or URL onto the user in the main console's user list.
Clicking on the "send file" button on the message console tool bar (Files only).

Files may be sent even when the other user is not online because they are temporarily stored in a repository where they "live" during approximately 7 days. If the file is not downloaded within that period, the repository server will delete it and the other user will not receive the file.
A reference to the sent file or URL is automatically added to the message console.

Receiving

Incoming files and URLs are notified as new messages in the message console. To download the file or open the URL double click on the message.
If the incoming item is a file, Sonork will ask you where to place it and what to do after downloading. Options are:

Delete: Will delete the file without downloading it.
Nothing: Will download the file and nothing else.
Open folder: Will download the file and open the folder where it placed the file.
Open file: Will download the file and open it. (For security reasons, "Open file" is disabled for executables or scripts)

After downloading or deleting an incoming file, the message remains as a reference.

Tips: Double clicking on a file reference opens the folder where the file is located.
(For incoming files not downloaded yet, double clicking will download the file)
If the CTRL key is held down while clicking, Sonork will open the file itself.
Moving or deleting the file invalidates the file reference, however the file information (name, size, date and download/upload location) will remain.

Deleting a file reference from the message console does not affect the actual file.